


Tired of chasing your dog down the street or worrying they’ll wander off again? A wireless dog fence could be the game-changer you need.
These smart systems are growing fast in popularity and for good reason. They offer a safe, invisible boundary for your pet without the need for digging, fencing, or expensive installations. Whether you’re a homeowner, renter, or have an awkwardly shaped yard, wireless dog fences adapt to your space and lifestyle.
By the end of this guide, you’ll know how to install a wireless dog fence in just 30 minutes, creating a secure zone your dog respects and giving you peace of mind.
Key Takeaways
- Wireless dog fences are easy to install, affordable, and great for any yard.
- A strong GPS signal and proper collar fit are critical for system performance.
- Training is essential to help your dog understand and respect boundaries.
- Testing the system before full use prevents safety issues and confusion.
- Regular checks and re-training keep the fence working long-term.
What You Need to Set Up a Wireless Dog Fence?

Dog Wireless fence success starts before you even turn it on. Here’s what to check first.
Before you begin learning how to install a wireless dog fence, make sure you have the right equipment and environment to ensure a smooth setup and safe use.
Basic Equipment Checklist
- A smart GPS collar with built-in tracking and correction features
- The brand’s mobile app is installed on your smartphone
- A strong and steady GPS signal (check outdoors with your phone first)
- A reliable power source to charge the collar daily
Dog Readiness
- Your dog should weigh at least 10–15 pounds (depending on the system)
- Be at least 6 months old and able to respond to basic commands
- Not be highly anxious or reactive to vibrations or tones
Phone Compatibility
- Most systems work with both Android and iOS
- Make sure your phone has Bluetooth, GPS, and the latest OS updates
- Allow app permissions for location, Bluetooth, and notifications
Environment Requirements
- Avoid setting up near metal sheds, large trees, concrete walls, or underground wires
- Pick an open area where the collar can easily lock onto a satellite GPS signal
- If you’re in a rural or hilly area, test signal strength before installation
Choosing the Right Location for Setup
Picking the right spot to begin setup makes a big difference in how well your wireless dog fence performs.
Best Setup Conditions:
Start in a wide, open area like your backyard, driveway, or open lawn. This helps the collar lock onto the GPS signal during initial pairing. Avoid starting indoors or near large structures.
Watch for Signal Blockers:
Wireless dog fences rely on satellite GPS. If you’re near any of the following, your setup may not work as expected:
- Metal buildings or sheds
- Underground cables or water pipes
- Concrete or stone walls
- Heavy tree cover or dense forests
Tip: Move away from these obstacles before activating the collar or mapping your boundary.
Plan Your Signal Range:
Most systems allow you to choose how far your dog can roam. For basic use:
- A radius of 50 to 150 feet is common for small yards
- Larger or custom-shaped properties may support flexible boundaries via app mapping
Tip: Use your mobile app to test signal coverage before saving your settings.
Pairing the Collar with the Mobile App
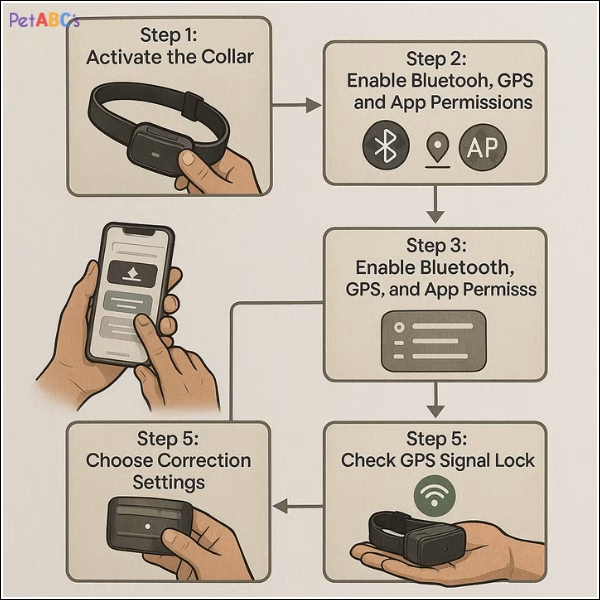
To start setting up your wireless dog fence, you’ll need to connect the collar to the mobile app. This pairing step ensures the system can track your dog’s location and apply boundaries correctly.
Step 1: Activate the Collar
Fully charge the collar before first use. Most models require pressing and holding a power button until a light or tone confirms it’s on.
Step 2: Install the Mobile App
Download the official app from the App Store or Google Play. Open the app and create an account if needed.
Step 3: Enable Bluetooth, GPS, and App Permissions
These settings allow your phone to find and stay connected to the collar.
- Turn on Bluetooth on your phone
- Enable Location Services (GPS)
- Accept all app permission requests (location, notifications, device access)
Step 4: Choose Correction Settings
Within the app, select how the collar should warn your dog:
- Sound only (for gentle training)
- Vibration
- Static correction (use carefully and only when necessary)
Step 5: Check GPS Signal Lock
Before creating the fence, make sure the collar shows a strong GPS signal. Go outside in an open area and wait for the signal status to turn green or “locked.” This ensures the mapping will be accurate.
Mapping and Setting Your Wireless Fence Boundary

Now that your collar is connected and has a strong GPS signal, it’s time to create your dog’s virtual fence.
Two Common Setup Methods:
- Walk-to-Map: Walk your property’s boundary with the collar and phone. The app will track your movement and create the fence line as you go. (Best for custom or irregular yard shapes.)
- Smart Map Drawing: Use your phone’s map screen to draw or drop pins on a satellite view of your property. (Great for quick setup or hard-to-walk areas.)
Choose Your Fence Shape:
Most systems support multiple shape options, including:
- Circular or radial zones (centred on a fixed point)
- Rectangular or square zones (via drawing tools)
- Custom zones (mapped manually to fit your yard)
Adjust the Safety Buffer:
The app will let you set a buffer zone, the space before a warning activates. A wider buffer gives your dog more time to respond before correction.
Start with 10 to 15 feet and adjust as needed.
Save Multiple Fences:
Many wireless dog fence apps let you save different zones for:
- Home
- Parks or vacation spots
- Friends or family yards
Tip: Switch between them anytime for flexible protection wherever you go.
Properly Fitting the Collar on Your Dog
Getting the collar fit right is key to making your wireless dog fence safe and effective. A poor fit can lead to discomfort or missed signals.
How Tight Should the Collar Be?
The collar should fit snugly, but not tightly.
Use the two-finger rule: you should be able to slide two fingers between the strap and your dog’s neck.
Positioning the Contact Points
- Make sure the contact points touch the skin, not just the fur.
- Place the collar under your dog’s neck or slightly to the side, depending on the model.
- Check that it sits flat and doesn’t shift when your dog moves.
Collar Safety Tips
- Only use the collar during training or outdoor activity, not all day or overnight.
- Check daily for any redness, irritation, or pressure marks.
- Never use the system on puppies under 6 months old or dogs with medical conditions.
Testing the Fence Before Letting Your Dog Off Leash

Before giving your dog full freedom, you need to test the system to make sure it works exactly as expected.
Test first, trust later.
Walk the Boundary Yourself
With the collar in hand, walk the mapped boundary area.
Listen for tones, feel for vibrations, or observe static correction as you cross into the warning zone. This confirms the fence is active and accurate.
Test the Warning and Correction Zones
Check that:
- The warning tone activates a few feet before the boundary
- The correction mode only triggers if the dog continues past the warning
- The collar resets when back inside the safe zone
Tip: Repeat the test at several points around the boundary to ensure full coverage.
Fixing Signal Dropouts
If the collar doesn’t respond:
- Move away from metal buildings, large trees, or hills
- Recheck the GPS signal strength in the app
- Restart the collar and walk the boundary again
Re-Calibrate If Needed
A few extra minutes of testing now can prevent big problems later. Once everything works smoothly, you’ll be ready for real training.
If your dog reacts too early or too late:
- Open the app and adjust the buffer zone
- Save changes and retest immediately before use
Training Your Dog to Understand the Fence

Even the best wireless dog fence won’t work without proper training. Teaching your dog to respect the boundary takes time, patience, and consistency.
Day-by-Day Training Plan
Day 1–2: Introduction
- Put the collar on and walk your dog on a leash around the safe zone.
- Let them hear the warning tone, then gently guide them back.
- Repeat in short sessions, 10–15 minutes at a time.
Day 3–5: Boundary Awareness
- Add boundary flags around the edges to give a visual cue.
- Walk your dog near the flags and reward them for staying inside the safe zone.
- Let them hear the tone again but avoid correction—use praise and treats.
Day 6–7: Tone-to-Correction Training
- Allow your dog to approach the boundary. If they ignore the tone and feel a correction, gently lead them back.
- Immediately reward them for returning inside the zone.
After 1 Week: Release Training
- Let your dog explore the yard off-leash while you supervise.
- If they stop at the boundary or return after a tone, praise them heavily.
Key Training Tools
- Boundary flags as visual markers
- A 6-foot leash for guided practice
- Plenty of treats and praise
Signs Your Dog Is Ready
- Stops when hearing the warning tone
- Stays within the zone even without a leash
- Shows awareness of boundary markers without fear
Training is just as important as setup. With consistent effort, your dog will learn where it’s safe to play, and you’ll both feel more confident outdoors.
Mistakes to Avoid When Installing Your Wireless Fence
Avoiding simple mistakes can save you hours of frustration and help your dog stay safe from the start.
Ignoring Training
The biggest mistake is skipping training altogether. Even smart dogs won’t understand a virtual boundary without proper guidance. Never rely on the system alone.
Skipping the Signal Test
Before letting your dog roam, test the boundary yourself. Skipping this step could lead to weak spots or signal dead zones your dog might cross.
Setting the Range Too Wide
A larger range may seem better, but too wide a zone can:
- Push boundaries too close to hazards like roads
- Make training harder
- Create GPS inaccuracies
Installing Near Metal or Concrete
These can block GPS signals and cause the fence to malfunction. Avoid placing your starting point near:
- Metal sheds or fences
- Concrete walls
- Underground cables or pipes
Not Checking the Collar Battery Daily
A dead collar means no fence at all. Get in the habit of:
- Charging the collar every night
- Checking battery level before outdoor time
- Cleaning contact points to keep the connection strong
How Much Does a Wireless Dog Fence Cost to Install?

Wireless dog fences are not only easy to install, they’re also cost-effective compared to traditional fencing. If you’re looking for a flexible, high-tech, and affordable solution, learning how to install a wireless dog fence is often the smartest choice.
Average DIY Installation Costs
- GPS-based wireless fence kits typically range from $100 to $500 or more, depending on features like range, correction modes, and waterproof rating.
- There are usually no monthly fees, unless the system includes optional cellular tracking or app subscriptions.
- DIY setup takes less than an hour and doesn’t require any tools or digging.
Optional Add-ons
You might want to invest in:
- Training flags for visual boundary cues ($10–$20)
- Solar-powered chargers for off-grid use ($30–$60)
- Extra collars if you have more than one dog ($70–$150 each)
Budget-Friendly Fence Alternatives
If you’re looking for the cheapest way to make a dog fence, consider:
- Chicken wire fencing: affordable and flexible, but needs posts and manual setup
- Wooden pallets: often free from local stores or farms, ideal for small yards
- Chain link fencing: durable and secure, but higher labour and cost
While these traditional options work, they don’t offer real-time GPS alerts, mobile control, or portability.
Final Tips for Long-Term Success
Once your wireless dog fence is up and running, a few simple habits will keep it working smoothly and safely over time.
Check the Collar Daily
- Make sure the battery is charged before each use
- Wipe down the contact points to prevent dirt or moisture buildup
- Inspect the fit to ensure it’s still snug and comfortable
Re-Train After Major Changes
If you move to a new home, adjust the fence layout, or change correction settings, spend a few days retraining your dog. Even well-trained dogs need time to adjust to a new boundary.
Troubleshoot Unexpected Alerts
If the collar suddenly starts warning or correcting inside the safe zone:
- Check for GPS signal loss (cloudy weather, metal objects, or nearby interference)
- Restart the collar and app
- Rewalk the boundary to recalibrate the fence if needed
When to Contact Support
If problems continue after basic troubleshooting, reach out to the manufacturer’s support team.
They can help with:
- App errors or connection issues
- Firmware updates
- Replacing faulty equipment
Tip: With daily attention and occasional retraining, your wireless dog fence can provide years of peace of mind for both you and your dog.
Conclusion
Installing a wireless dog fence is a smart, flexible way to keep your dog safe without the hassle of digging or building a physical fence. With the right setup, training, and daily checks, you can create a secure space where your pet can roam freely and safely. Now that you know how to install a wireless dog fence, you’re one step closer to stress-free backyard freedom for your furry friend.
Frequently Asked Questions
Q1. Can I install an invisible dog fence by myself?
Yes. Most modern GPS-based systems are designed for DIY installation with easy mobile app setup. No digging, wires, or professional tools are required.
Q2. Do wireless dog fences work?
Yes, when set up correctly and combined with consistent training, wireless dog fences can reliably keep your dog within a safe, invisible boundary.
Q3. What’s the cheapest way to make a dog fence?
For tight budgets, DIY options include chicken wire, wood pallets, or chain link fencing. These are low-cost but don’t offer GPS alerts or flexibility like a wireless system.
Q4. Will a wireless dog fence work in rural or wooded areas?
Yes, but performance depends on GPS visibility. Choose an open space free from dense trees, hills, or large metal objects that could block the satellite signal.
Q5. Are wireless dog fences safe for small or older dogs?
Generally, yes, for dogs over 10 to 15 pounds. For senior dogs or those with health issues, talk to your vet before use to make sure the collar and correction method are appropriate.
Q6. Do GPS dog fences need Wi-Fi or a phone signal to work?
Most GPS fences don’t need Wi-Fi or cellular service for daily use. However, internet access may be required during the initial app setup or for software updates.
Q7. Can I use the same wireless dog fence when travelling or camping?
Yes. Many wireless systems let you create and save multiple fence zones, so you can set up safe areas at parks, RV sites, or vacation homes with just a few taps.
Q8. What should I do if my dog crosses the wireless boundary?
Check that the collar is fitted correctly and fully charged. If needed, adjust the warning or correction levels in the app, and reinforce training with short supervised sessions.